I want to make something simple, small and elegant for my lover’s birthday. Finally I come up with using 5×7 dot matrix led to make a flower vase, it can be used to display some text messages for her:)

Here are the components:
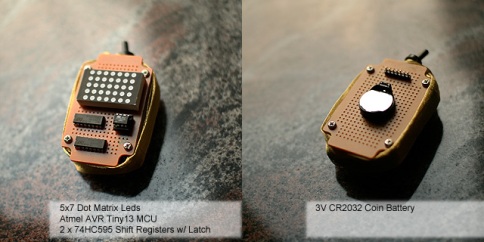
1. 5×7 dot matrix led
2. Atmel AVR tiny13
3. 2 x 74HC595 shift register with Latch
4. 2 x wooden prototype boards
5. 1 x coin battery holder
6. 1 x CR2032 coin battery (3V)
7. 3 x paper flowers
8. semi-transparent brown mud (from Franc Franc)
9. Switch for turning ON/OFF
I want to make things small, so I put the 5×7 dot matrix led horizontally and used the 5×4 dot matrix font, such that it can nearly display 2 characters at a time. For the MCU part, AVR Atmel tiny13 is a very small MCU, it is quite suitable for this kind of small application. The only problem is that it has limited IO pins, I have to use 2 x 74HC595 chips to extend the output pins, so I can driver 5×7 dot matrix led with only 3 IO pins, i.e. Clock Data, Latch.

Sorry for not posting any circuit digram, as I make it in hurry. After I spend a lots of time soldering the lines linking between the leds and the shift registers, here is the circuit board:
Then, I program the AVR Tiny13 with the STK500, the socket on the prototype board is a DIP socket, so I program the Tiny13 on STK500 and then put it back on the board to test. After several hours, the software is done.
Let’s put all the things together! I really love the effect when putting the led matrix in the transparent mud, the brown color is a good match.

Video demo:
Lastly, don’t forget the packing!

Hope you all may find useful.
Please also check out the notes by bitartist, including schematic & source codes:
http://www.bitartist.org/2009/02/led-flower-vase-supplementary-note.html


Recent Comments